This repository contains an AI-powered solution for the early detection of Leukemia from blood smear images. Leveraging a Convolutional Neural Network (CNN), the model classifies input images as either Leukemia-positive or normal, aiming to assist healthcare professionals in rapid preliminary diagnostics. It is the part of hackathon IEEE Medhamanthan 2025 organized by IEEE kolkata section.
- Optimization of the custom cvt model for better accuracy and performance.
- Development of complete backend using fastapi server for raspberry pi deployment.
- Model testing and inference code development.
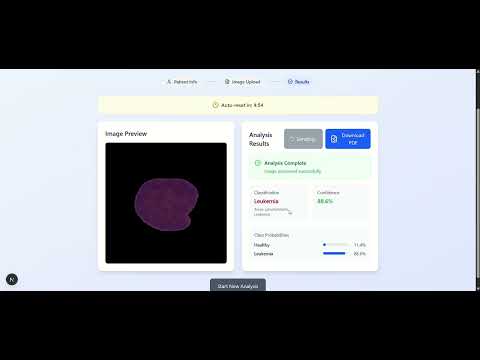
In this demo, the application is running on raspberry pi 5, ubuntu 22.04 server os. We are accessing the application through the device's ip in the local network in which the device is deployed.
- Deep Learning-Based Classification of blood smear images for early Leukemia detection.
- Lightweight CNN Architecture optimized for low-resource environments such as Raspberry Pi.
- Preprocessing and Data Augmentation Pipeline to enhance model robustness and accuracy.
- Modular CLI Scripts for training, testing, and evaluating models on both desktop and edge devices.
- Raspberry Pi Deployment Support with compatibility for Docker-based runtime and service management via
systemd. - Model Checkpointing for saving and loading trained weights to enable quick redeployment or offline inference.
Client Side: Next.js + TypeScript
Server Side: FastAPI
To run it locally on your computer:
git clone https://github.com/kunalkushwahatg/Leukemia_detection
cd Leukemia_model
docker build -t medhamanthan-app .
docker run -d --name medhamanthan-app -p 3000:3000 -p 8000:8000 medhamanthan-app
or pull it from docker hub:
docker run -d --name medhamanthan-app -p 3000:3000 -p 8000:8000 hrushi225/medhamanthan-finalThis application is optimized for deployment on a Raspberry Pi 4 or newer running Ubuntu 22.04 (64-bit). The service runs inside a Docker container and is accessible on the local network via port 3000. For stability and ease of access, we have also configured Nginx as a reverse proxy which makes it accessible to devices on the local network.
Update the system and install Docker Engine:
sudo apt update
sudo apt install -y ca-certificates curl gnupg lsb-release

sudo mkdir -p /etc/apt/keyrings
curl -fsSL https://download.docker.com/linux/ubuntu/gpg | \
  sudo gpg --dearmor -o /etc/apt/keyrings/docker.gpg

echo \
  "deb [arch=$(dpkg --print-architecture) signed-by=/etc/apt/keyrings/docker.gpg] \
  https://download.docker.com/linux/ubuntu $(lsb_release -cs) stable" | \
  sudo tee /etc/apt/sources.list.d/docker.list > /dev/null

sudo apt update
sudo apt install -y docker-ce docker-ce-cli containerd.io docker-compose-plugin

sudo systemctl enable docker
sudo systemctl start docker
(Optional) Add your user to the Docker group:
sudo usermod -aG docker $USER
newgrp dockerPull the pre-built image from Docker Hub:
docker pull hrushi225/medhamanthan-finalRun the container:
docker run -d \
  --name medhamanthan-backend \
  --restart=always \
  -p 3000:3000 \
hrushi225/medhamanthan-finalTo ensure the container runs after a reboot, create a systemd service:
sudo nano /etc/systemd/system/medhamanthan.servicePaste the following content:
[Unit]
Description=Medhamanthan Backend Docker Service
After=network.target docker.service
Requires=docker.service

[Service]
ExecStart=/usr/bin/docker start -a medhamanthan-backend
ExecStop=/usr/bin/docker stop medhamanthan-backend
Restart=always
TimeoutStartSec=0
User=ubuntu

[Install]
WantedBy=multi-user.target
Then enable and start the service:
sudo systemctl daemon-reload
sudo systemctl enable medhamanthan.service
sudo systemctl start medhamanthan.serviceInstall Nginx:
sudo apt install nginx
sudo systemctl enable nginx
Create an Nginx configuration file:
sudo nano /etc/nginx/sites-available/medhamanthanPaste the following configuration:
server {
    listen 80;
    server_name _;

    location / {
        proxy_pass http://localhost:3000;
        proxy_set_header Host $host;
        proxy_set_header X-Real-IP $remote_addr;
        proxy_set_header X-Forwarded-For $proxy_add_x_forwarded_for;
        proxy_set_header X-Forwarded-Proto $scheme;
    }
}
Enable the configuration:
sudo ln -s /etc/nginx/sites-available/medhamanthan /etc/nginx/sites-enabled/
sudo nginx -t
sudo systemctl restart nginxOnce deployed, you can access the application from any device connected to the same network using your Raspberry Pi’s IP address:
http://<raspberry-pi-ip>/
To find the IP address of your Raspberry Pi:
hostname -IExample:
http://192.168.1.101/
The Nginx reverse proxy will forward requests on port 80 to your backend service running on port 3000.